See the website you’re reading this on? I didn’t make this in 10 minutes…. But I sure could have if I had this tutorial. So here’s how you can make your own customizable resume website or blog for free in 2021 using the Hugo framework, a few commands in the terminal, Github Pages to host it.
Skip to Part 1: Let’s make a website if you wanna skip my banter 😔
First off, Why Hugo?
I think it’s nifty as hell.
You basically only need to write markdown once its set up.
I’ve made uncountably infinite1 websites in my time and it’s always been a pain to update them, especially if you don’t always want to code, deal with CSS each time, or some crappy WYSIWYG editor.
Hugo basically smashed my 3 requirements:
- Be easy to set up - it’s literally like <5 lines on the command line. 😌
- Look sexy, work optimally. - Has great themes and generates static pages. 🤩
- Most importantly: Be easy to update with new content. - Bye bye Wordpress! 💀
To expand on 3, I do love me a bit of coding. I do it all the time. But this website is for writing and expressing my thoughts. Not coding. I have enough of that at my day job. So any extra code I need to write or dumb sFTP process I have to do to put out new content is bad.
Also, writing in markdown with Bear Notes and doing 3 commands to publish is incredibly liberating when compared to something like Wordpress. It also has some really cool out of the box features like comments, search, code syntax hightlighting, translations, and google analytics support.
Why should you make a blog (or resume website)?
The reason for a resume website is self-explanatory:
It gives you clout.
But so does writing! And its also fun! Even if you don’t enjoy writing, it’s an incredible skill for immortalizing yourself in history. Or minus the hyperbole, for crafting convincing emails to your very human stakeholders. They can usually be swayed by a little loquacious liturgy of poignant prose.
Back on the clout thing; have you ever seen a TED or DEFCON talk? We often look at these people like, “I’ll never be smart enough to give a talk like this.”, or “I’m not an industry expert, I don’t even know how I would start doing something like that.”
The thing is, they are just normal people like you and I with some better publicity.
Starting a blog on what you already know is a solid way to begin developing your public persona, but even if that’s not your cup of tea, let’s say you’re up for an interview at a FAANG company: It will make you look really REALLY good.
Readers will tend to give you the benefit of the doubt and assume your knowledge on a subject goes very deep. You’re something of an SME as the cool kids might say. You may not be2, but it’s just a serendipitous thing about publishing content. Although, it may become a self-fulfilling prophecy as you learn everything possible to spite your commenters who are flaming the living crap out of you. 🔥
Tl;Dr: Try some writing! 😎
Part 1: Let’s make your website
This is basically my curated summary on the Hugo Quick Start paired with the PaperMod theme.
Requirements
1. Pop open the terminal and install Hugo
I use a Mac with Homebrew. Here’s Hugo’s install docs for more options.
# Mac & Linux
brew install hugo

# Windows
choco install hugo -confirm  # Normal, no SCSS

# Verify it says something like "Hugo Static Site Generator v0.80.0/..."
hugo version
2. Choose a theme
This a really exciting piece of Hugo. The themes here are beautiful, minimal, and beautifully minimal. You just pick one and can configure a few params and have a working website. You can customize it more later too!
Find a theme here: themes.gohugo.io . I chose the beautifully minimal PaperMod by Aditya Telange and will be using that for this tutorial.
3. Generate your website
Generate your generic Hugo website named quickstart or any name you choose.
# if you want to use the PaperMod theme I'm using,
# we generate the Hugo template with a yaml config
hugo new site quickstart -f yml

# or for a normal site with a toml config
hugo new site quickstart
Note: If you didn’t choose PaperMod as your theme, you may need to run a different command. Check out their documentation, it will likely be one of the 2 commands above.
4. Add chosen theme to your your website
Clone the chosen theme into your project and add it in the config.yml.
For the PaperMod theme:
cd quickstart
git clone https://github.com/adityatelange/hugo-PaperMod themes/PaperMod --depth=1
echo theme: \"PaperMod\" >> config.yml
5. Add your first content
Quoted from Hugo Quick Start
You can manually create content files (for example as
content/<CATEGORY>/<FILE>.<FORMAT>) and provide metadata in them, however you can use thenewcommand to do a few things for you (like addtitleanddate):
hugo new posts/hello-word.md
Edit the newly created content file at content/posts/hello-word.md in a text editor like VSCode. The hello-word.md will look something like this, add in some content!
---
<!-- Front loaded content Hugo uses to define post -->
title: "My First Post"
date: 2019-03-26T08:47:11+01:00
draft: true
---

<!-- Write your markdown here -->

# Hello, World!
Drafts do not get deployed; once you finish a post, update the header of the post to say
draft: false.
6. Start the Hugo server
Run your local Hugo server for development and writing articles. You’re website should be alive. 🧛♂️
# Runs a local server and the `-D` arg which builds drafts
hugo server -D
Open http://localhost:1313/ and see your beautiful creation 🎉
7. Customize Your Theme
The config.yml in the root dir is your life blood.
It’s how you customize your website. While the Hugo server is running, any change you make to the config.yaml or in a post your are writing will update on save in your browser. Sweet 🍭
Take a look at these sources below on how to augment your theme:
- PaperMod Docs (Contains demo of site, demo config.yml, and a list of the features)
- My config.yml (for this website)
- Theme Docs | Hugo
- The GitHub for whichever theme you chose.
8. Build the website for production
Simply builds and minifies the production website into the public/ directory. Also moves all your static assets/ (extra css, js, and images) into public/.
hugo
Easy as 🥧
You have an optimized, static website! You could just stick contents of the public folder up on a web server right now and be done with it. That’s cool and all but it doesn’t meet the bar I set for requirement 3: “Be easy to update with new content”.
Imagine if we could just write our new post, build the new site with the hugo command, and then publish the website live with one push to Github? It’s actually not too hard and its free! You also get SSL thrown in there too!
Part 2: Hosting Your Hugo Site On GitHub Pages
Now I’ll be summarizing the Hugo Github Pages Docs and Github Pages Docs.
GitHub Pages
Github allows you to make 2 kinds of Github Pages projects.
- User/Organization Pages (
https://<USERNAME|ORGANIZATION>.github.io/) - Project Pages (
https://<USERNAME|ORGANIZATION>.github.io/<PROJECT>/)
We’re going to do a normal user page like the one your currently on.
1. Create your Website repo on GitHub
Go to your GitHub account in the browser. Create a new repository for your website with the name <username>.github.io. username is your Github username. You can add a README.md to the repo on creation. If you need help: Github Pages Docs.
Note: You can skip steps 2 and 3 if you’d prefer to git init your current Hugo site repo and point it to your <username>.github.io remote.
2. Clone the <username>.github.io repo locally
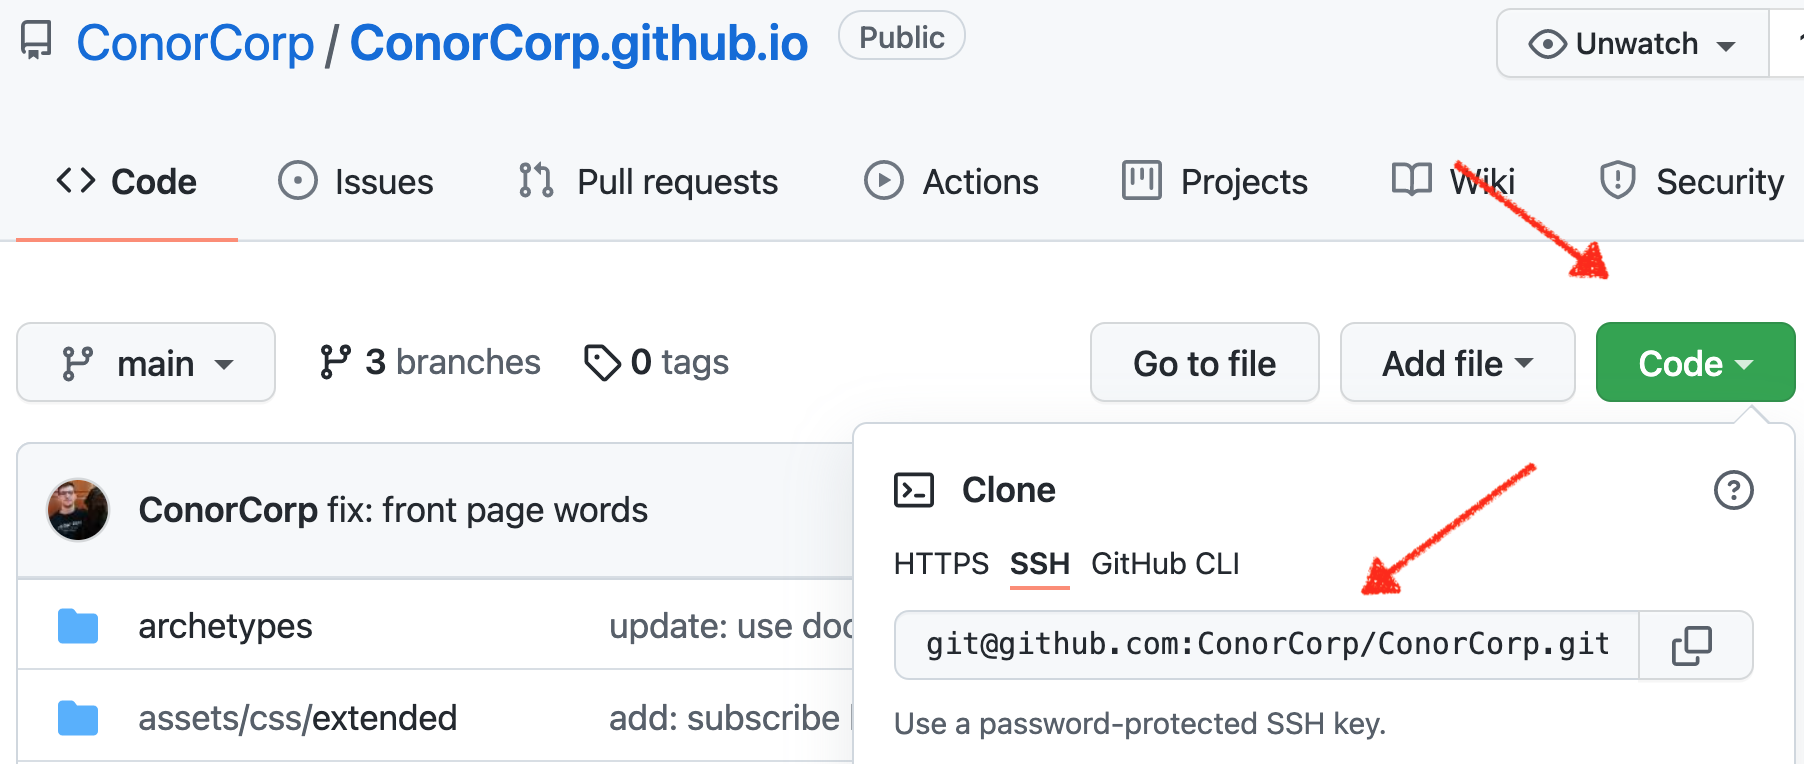
Example of the created GitHub repo and url to clone it.
Pull the repo down locally with SSH or HTTPS link. Use HTTPS if you haven’t set up SSH.
git clone git@github.com:<username>/<username>.github.io.git
3. Copy your whole Hugo website into this repo
Copy the contents of your quickstart (or custom website name) folder into your newly cloned repo.
cp -r quickstart/* <path-to-cloned-repo>
# cp -r quickstart/* ConorCorp.github.io
4. Change the config.yml to make new builds in docs/
Github Pages only allows you to host your website from 1 of 2 directories in your repo. As of this writing they are: / (root) or /docs.
We want to make sure that our visitors are only served the (optimized) production website code. Although, it’d be much cleaner if we saved both our development code and production website code in the same source-controlled repo.
So, we will now update the Hugo config to build all of our production code only in the /docs folder and tell Github only to host that folder. First, let’s clean up.
cd <path-to-cloned-repo>
# Remove default publishdir folder, we're using `docs/` now.
rm -r public
In the config.yaml, update:
baseURLtohttp://<username>.github.io/publishdirtodocs
A basic config.yml may now look like:
baseURL: http://conorcorp.github.io/
languageCode: en-us
title: Conor Lamb
theme: "PaperMod"
publishdir: docs
5. Build your website for production.
Build your production website and push our code to our online repo.
hugo

git add .
git commit -m "update: publish dir"
git push origin main
6. Update GitHub Pages to host the docs/ dir.
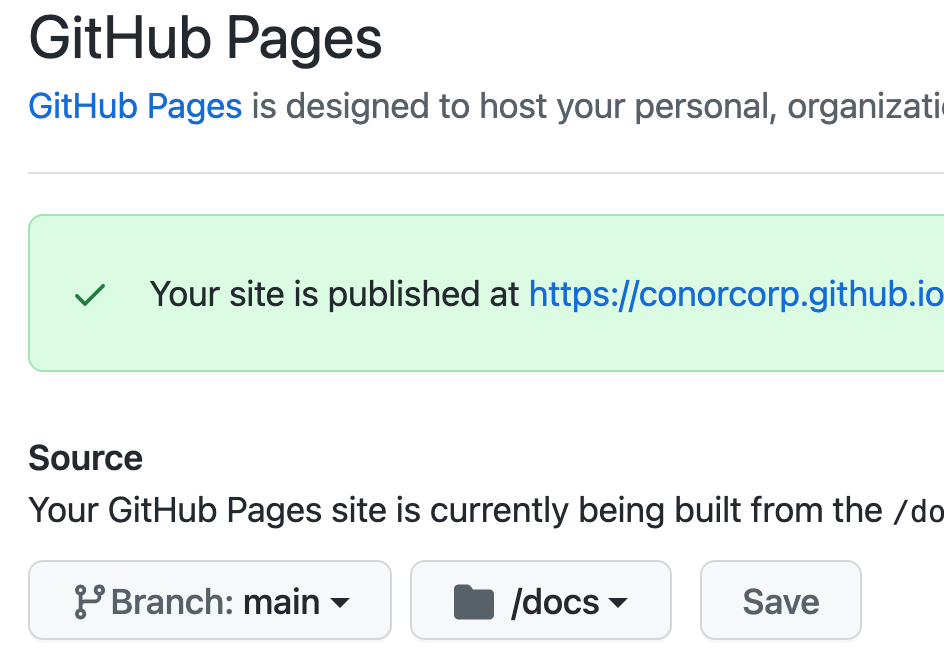
Example of published Github Pages and docs config.
- From GitHub in your browser, go to the
<username>.github.iorepo. - Go to
settings -> pages. - Update
Sourceto point to/docsdir on themainbranch. - Your site should be published, now go to
<username>.github.ioin the browser.- Note: If your site has not published automatically, make sure someone with admin permissions and a verified email address has pushed to the publishing source.
Done! 🎊
You now have a public, static3 website, built on Hugo and hosted for free with Github Pages! Its super easy to update too! Its ~5 commands including the git stuff. Feel free to add the code below to you’re README.md for your future updates.
hugo server -D  # Local development with drafts
hugo new posts/name-of-post.md # Add new post
# make sure "env: production" in config.yml for PaperMod
hugo # Builds in /docs directory
# add and push to git for auto build within 1 min give or take
P.S If you’d like cut out 1 step in this process, you can add a Github Action to auto build and deploy production on commits. Imagine all the time you’ll save by not typing in hugo to build production as well???!!!
Let me know if you found this post cool or helpful with a share, follow, or sub! You can reach out to me on my socials or subscribe to my blog for more of this jazz 🎷 If you have any suggestions, hit the Suggest Edits button up top!
I’ve also done a few other sneaky things with my template that I’m happy to chat about. Check out dat sweet JS on my “Subscribe” button ;)
Thanks lads. Huge that’s to Aditya Telange for PaperMod and the Hugo Team